Shares 2
How To Repair Rust Holes In A Motorcycle Fuel Tank?
Last updated on 19-Jun-2026 , By Saleh
Motorcycle owners experience serious headaches when dealing with a rusted fuel tank. as motorcycle fuel tanks are made with metals that can easily rust over time. A rusted fuel tank not only compromises longevity and safety but can also lead to fuel leakage, reduced fuel efficiency, and compromised performance due to fuel contamination. However, fear not! It is possible to solve this problem. Here, we will describe the process of repairing rust holes in a fuel tank.

How To Repair Rust Holes In A Motorcycle Fuel Tank?
As motorcycles wear in their service life, they encounter various issues, and rust buildup in the fuel tank is a fairly common problem. However, if rust buildup in fuel tanks is not properly addressed it can lead to the formation of rust holes, which can cause serious problems such as fuel leaks and decreased engine performance due to contamination. Therefore, here we will provide comprehensive steps to repair rust holes in a fuel tank. Follow these steps carefully.
Also Read: Bajaj 250cc Bikes In Bangladesh
Repairing rust holes in the fuel tank is not a complicated task at all. With the right tools, materials, and procedures, you can do this task in your garage. To complete this repair job, you will need some tools and materials such as screwdrivers, wrenches, pliers, a wire brush, sandpaper, metal body filler or epoxy putty, gasoline-resistant sealant, spray primer, suitable paint for fuel tanks, cotton rags, etc. Additionally, ensure your safety by wearing safety goggles, gloves, and a dust mask while carrying out the repair work.
Before you begin working on your motorcycle fuel tank, park the motorcycle in a well-ventilated and properly illuminated area, keeping any potential sources of ignition at a safe distance from your workspace. Then, fully drain the fuel tank to prevent any accidental mishaps during the repair process. Next, carefully detach the fuel tank from the motorcycle by following the manufacturer's instructions. This may involve disconnecting fuel lines, electrical connections, and any securing brackets. Once again, inspect the fuel tank to ensure that no fuel remains inside.
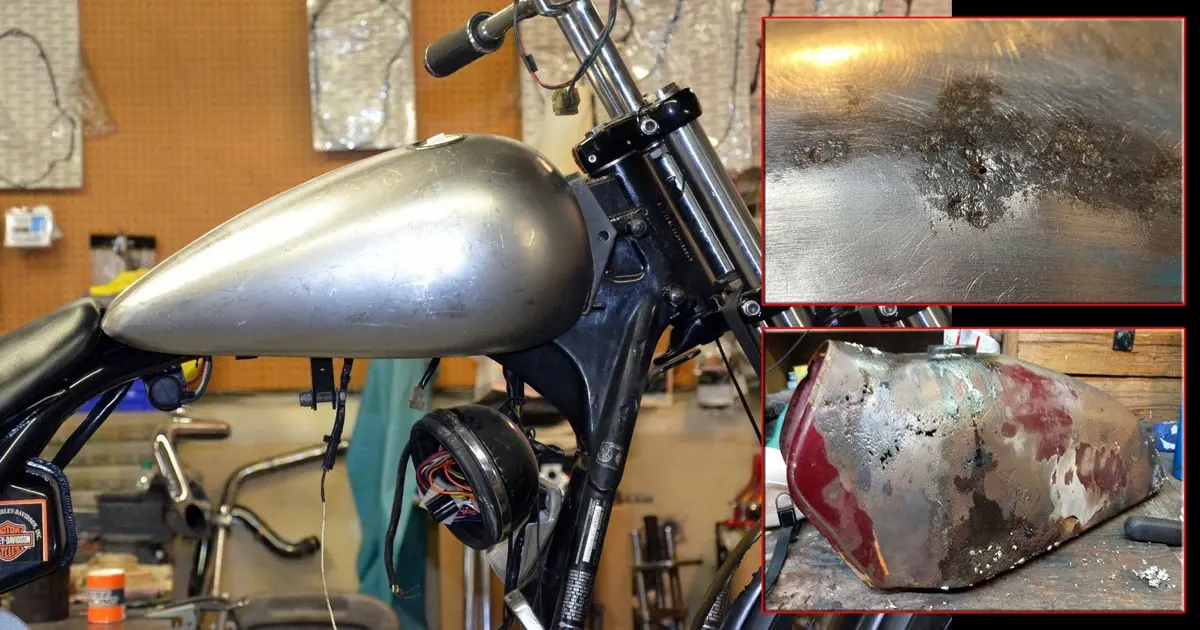
Then, clean the fuel tank thoroughly, removing dust, dirt, and debris. Additionally, clean the interior of the fuel tank to eliminate any residue or rust deposits, using a dedicated tank cleaner or metal cleaner agent. Next, conduct a comprehensive inspection of the tank, checking for rust holes or other damage. Utilize a wire brush and sandpaper to clean the affected area, eliminating any rust buildup, paint, or debris. Wipe the area clean using a clean cotton rag and a dedicated degreaser agent, and then allow it to dry.
At this time, once you've identified a rust hole in the fuel tank and properly cleaned the affected area, apply an anti-rust agent according to the instructions provided with the product. This will help neutralize any remaining rust and prevent further corrosion. For small holes, apply epoxy putty or a metal patch kit designed for fuel tanks. Follow the manufacturer's instructions to mix and apply the putty or patch. After drying, smooth the surface using sandpaper to ensure a tight seal.
For larger rust holes, reinforce the affected area with fiberglass cloth or mat treatment. Cut the cloth to cover the hole completely, allowing for some overlap. Apply epoxy adhesive to the surface, press the fiberglass cloth onto it, and then apply another layer of adhesive on top. Smooth the surface to create a secure bond. Allow the treated area to cure, following the recommended time provided in the manufacturer's instructions for the epoxy putty or adhesive.
With the repair of the rust holes, you are nearly complete the repair job. Now to protect the repaired area and prevent future rust buildups apply a fuel-resistant primer coat of paint specifically designed for motorcycle fuel tanks. Before this, use sandpaper to level the repaired area with the surrounding surface. This will create a seamless finish and ensure proper adhesion of paint.
After completing the paint job following the application of the primer coat, the repair work is finished. Now, you can reattach the fuel tank to the motorcycle. Before doing so, re-check the tank for any signs of rusty damage and confirm that all pinholes have been perfectly repaired. If necessary, perform any additional repair work before securing the fuel tank, ensuring there are no more leaks. Finally, take a test ride and enjoy your motorcycling, cheers!
T
Published by Saleh

About Saleh
Writer


Best Bikes

Price: 169800

Price: 255000

Price: 212000